How to do Woodworking Without a Workbench
Our recent survey found that over 30% of the Common Woodworking audience didn’t have any kind of workbench. To many, this will be the obstacle standing between them and practical woodworking. However it is possible to begin your woodworking journey with nothing but a small collection of tools (see our buying tools guides for more information) and some sturdy clamps.
Not everyone has a dedicated woodworking area in their house so a workbench may not be suitable. Although this may limit the projects you can make, it certainly shouldn’t stop you from progressing.
We recently released the ‘Chopping Board‘ course, a remake of one of Paul’s popular YouTube videos from 2016, where we challenged Paul to complete the project without using a workbench. As an alternative, Paul used a Workmate® which is a smaller, lighter, collapsable working station. It enables you to clamp your work and keep it secure when working. Although it doesn’t work as well as a solid workbench, it is a great in-between step to allow you to continue woodworking.
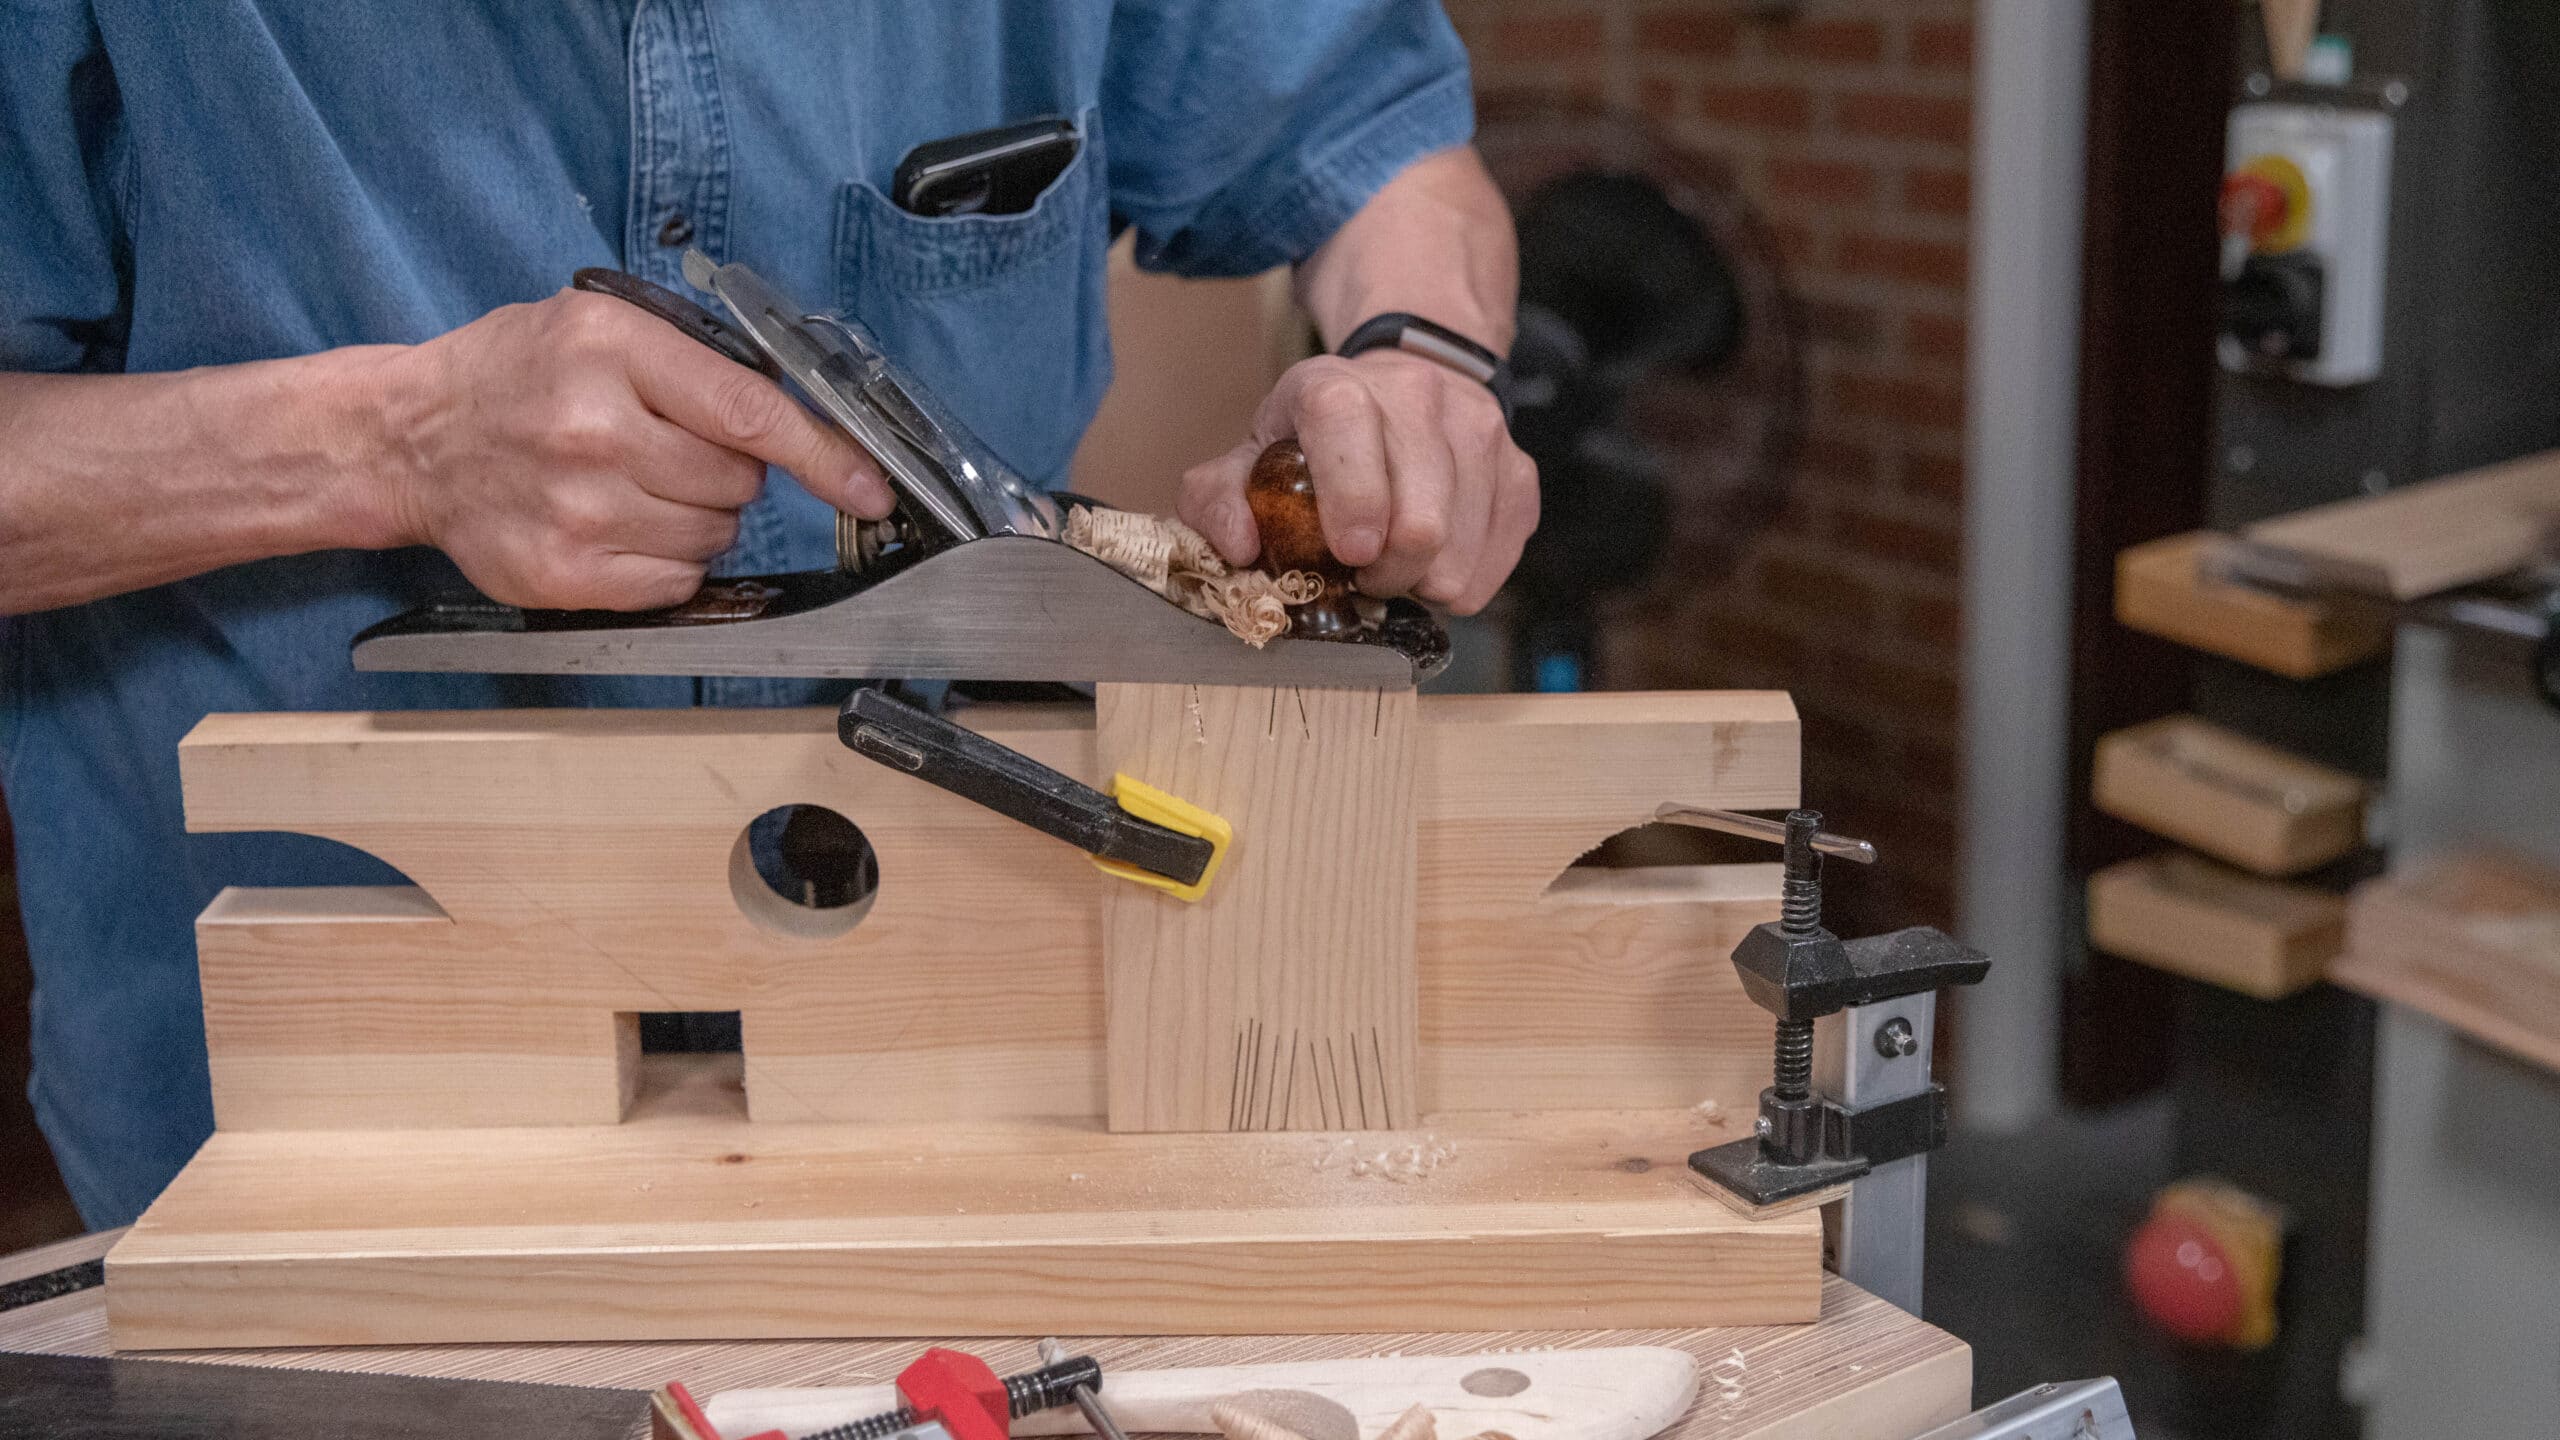
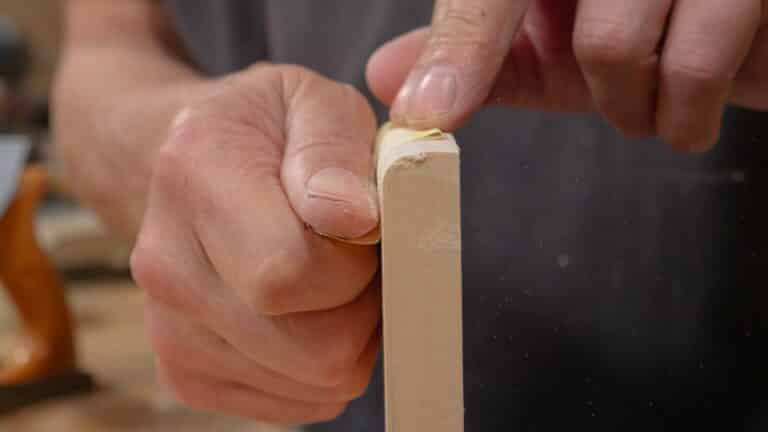
Paul has made a simple jig which allows you to clamp and secure many different shaped pieces without a vise. This can be made by using clamps on a regular table top.
Using a jig, clamps (f-clamps and sash clamps) and a table, Paul demonstrates the different ways you can secure your wood to enable you to work without a workbench:
Have you got any other alternatives to a Workmate®? Let us know in the comments below!

I do. there are a few nice little designs that have come out of the US and Germany.
they are little bench top jigs made with a few f-clamps.
Jonathon Katz-Moses and Laura Kampf have a few nice designs on YouTube.
I am from Portugal. I haven’t seen here small workbenches suitables or versátiles for a fair price, so I never tried a project at home.
Bye. Nuno.
One of the most effective portable workbenches I have ever used was made of scrap plywood, but could be made of any found wood. It was built quickly and cheaply. It was based upon the design of Stephan Pöhnlein and can be seen in use here:
https://www.youtube.com/watch?v=CBe0AcaHdsQ&list=FLCQF6xwluEFL_ySI7e8lKDQ&index=10&t=0s
The outside dimensions that I used were based upon the work surface side that I had, the material on hand, and could be modified to any dimensions within reason since you still have to lift and store it. Mine turned out to be 48″ long (~122 cm) by 24″ (~61cm) and was 5-1/4 tall (~13cm). The undercarriage was built out of 3 layers of laminated 3/4″ (~19mm) plywood strips each 2-1/4″ (~6cm) wide, the top is a single piece of plywood. I drilled some 3/4″ (19mm) holes through the top and the ribs to use dowels as bench dogs. It worked a charm. I did find you need some high friction surface under it (like a rubber sheet as shown in the video) to keep it from moving or marking the table it rests on.
Is Paul going to do a video about this jig?
I think that the above jig is a great addition to a work bench to secure items that can be challenging in a vise alone. Using this jig as a workbench would require securing to a counter top or maybe an outdoor horizontal rail to provide the stability needed.
Another option for those that live in apartments or space restricted homes could be the closet workbench described by Aldren Watson in his book “Hand Tools Their Ways and Workings”. It would provide a most stable work surface with minimal impact to the living space.
Same concept as shown above, Yoav Liberman of Popular Woodworking had an interesting series about “bench bulls” for his students. https://www.popularwoodworking.com/woodworking-blogs/bench-bull-the-jack-of-all-bench-jigs-part-1/
I can see the value of the appliance above, even on a bench, as raising the work for certain joinery tasks can save the back.
BTW, I cringe when see Paul suggest a Workmate – I used a Workmate to build a writing desk, and that experience of mortising the legs was enough to convinced me to build a work bench as my next project. So I built a Moravain Style bench based on Will Meyer’s plans, using 2×4 lumber and laminating the top.
Hi Paul,
Do you have instructions for how to make the jig featured in the article “How to do Woodworking Without a Workbench”?
Thanks, Anne
I found the biggest obstacle to using a Workmate or similar, even once you have got indeed a clamping arrangement like Paul shows, is that (a) the bench moves and (b) there is a lot of play in the collapsible mechanism.
(a) can be cured by having some secure way of holding the bench down, and (b) with suitable wedges placed in the mechanism.
It makes more than a world of difference!
Thanks Izzy, Tell Paul this is exactly what I need to get going.
I like this jig! Would be perfect for ‘dining table projects’. What’s the purpose of the notches at either end?
Hi,
The notches are to leave space for clamps.
Kind Regards,
Izzy
Thanks, Izzy!
Before I made my bench, I bought a $18 Irwin Marples “woodworking vise” at the big box store. I then bolted it to a piece of 2×6 construction scrap I had. Screwed on some 3/4 oak planks to make the jaws wider and softer. I was then able to use clamps to clamp the 2×6 to a table and use it for some light duty work.
The jig is a fantastically useful idea! Though I’ve made DIY type workbenches for power tools, they were always a bit tall for hand tool woodworking. Further, my lack of joinery skill has forced me to use saw horses, a borrowed Workmate, a nice inexpensive Home depot portable work station with the Husky brand and even one by Kreg. None of thewse are really easy to plane on, however, due to “racking” forces. Realizing I needed a dedicated woodworking bench to at least get started and it isn’t always possible to borrow a Workmate or one of it’s clones, I finally bought the cheap but infinitely useful Harbor Freight woodworking bench. I knew it would “rack” when I tried to plane, but unlike many who just loaded it up and bolted on a stringer to add weight, I found that the stick on heavy rubber stair tread, sold for about a dollar, can be cut to fit and I glued a tread to each foot, minimizing the racking. With tools on board, it is pretty sturdy. I also glued the pieces together using Titebond 3. The vise isn’t all that useful, but a hold fast and the dogs work well, as well as anywhere I can find to fit a clamp. A bit of painter’s tape on the under side of the holes keeps the shavings out of the drawers. The top and legs are solid wood, and the thickness of the top is actually greater than the expensive Sjobergs brand hobby benches, though obviously not on par with their top models. At any rate, I have about $120 in it and it suffices for now. Great article! I would like to try making a bench like Paul’s out of construction grade lumber (that was an incredible video series!,) but fear that the truing and joinery might exceed my skill level.
@bytesplice We need a picture of that bench.
Richard, I would be interested to see some pictures of the wedging in the collapse mechanism. There is a nice youtube video where the guy uses a ratchet strap to hold the workmate to a larger sheet of plywood.
https://www.youtube.com/watch?v=EU03vb0tL0U
And also some other variants on the jig as well.
https://www.youtube.com/watch?v=KrI5lQG9rXk
Colin
Ratchet straps can turn any old table, even foldable ones, into a rock solid bench to get you going until you can build a real bench. They also improve workmates.
I put screw eyes into my garage wall, about a half foot off the ground, and tied down the metal frame of a foldable picknick table. It does not move at all, no matter what I do. It’s like it is part of the building. The straps are very cheap and can be had in 4 packs at big box stores. If you put the table into a corner you will only need two straps to tie it down and pull it tight against each wall and into the corner. The screw eyes cost pennies at hardware stores. I am using 1/4″ x 3-3/4″ lag screw eyes with a safe working load of 120 lbs, which is plenty.
Make sure you attach the straps to strong parts of your table or put the strap across the table top on lighter tables. The ratchet mechanism can exert a lot of force and could probably bend light metal parts or dislodge wooden table legs. Tighten slowly until happy but don’t overtighten until sorry.
I am also using a ratchet strap to tie a workmate “to itself” and remove play in the foldable parts. Again, don’t overtighten.
This method should work pretty much anywhere. In the US make sure your screw eye / eye bolt goes into a stud behind the plywood of your garage wall or the sheetrock of your home. In European outer walls, drill holes into the brick/cinderblock/concrete and use anchors to screw in the eyes. This should be permissible even for tenants in apartments if you seal the holes again before you move out (and don’t hit water or power lines;-). If you own your concrete garage floor you might also consider using that method for attaching a workmate to the floor. Workmates don’t attach well to a wall because the top is smaller than the base.
If you are in an apartment, be aware that the sounds of sawing, chopping etc. may travel through the wall pretty well since the table top basically becomes part of the wall.
You might also want to stuff some foam or a folded bed sheet between the edge of the table top and a nice white wallpapered wall to prevent marks (it won’t help much with noise).